DevOps, Continuous Integration & Continuous Deployment (CI & CD) with Jenkins, SonarQube, Nexus, Docker and Kubernetes for Micro-services
Introduction
Micro-service is an application design pattern where a complex application is broken down into smaller piece of self-independent services which provides independent development, test, deploy, run, monitor and maintenance. There are different decomposition patterns are available which are applied to break a complex monolith application into micro-services e.g. domain-driven approach, capability-based approach etc. Micro-service design pattern provides many benefits on top of conventional & monolithic application design pattern. Some of the benefits are:
- Reduced complexity, easy to develop, maintain, monitor, support — Since application is broken down into pieces therefore complexity is also distributed.
- Rapid, agile and parallel development, deployment and release / rollback management can be achieved.
- Reduced downtime and fault-tolerance — application is broken into independent micro-services so in case of any service failure, it will impact on certain area instead of failing entire application
- Resilient, smaller startup/shutdown time — micro-services are quite robust, adapt changes very easily. It takes lesser time to startup and shutdown as smaller runnable component
- Control on processing, easy scale up / down — better control on putting processing power where it is actually required (cpu / ram). It provides easy scale up and down based upon need.
- High use of automation — with micro-services build, test, deployment and liveness maintained with high use of automation.
- Technology agnostic — micro-service can be developed in different technologies, they can integrate with each other and collectively make a single complex application. This also referred as polyglot.
As micro-service design pattern breaks down a complex application into smaller piece of self-independent runnable components which integrates with each other and collectively served the completed application with several features over the conventional design patterns. Since each micro-services are designed, developed and deployed independently, there are number of cross-cutting concerns for development need to performed separately for each micro-service e.g. planning, coding, build, test, deploy, release, monitor etc. To setup and develop micro-services efficiently and effectively, a popular and emerging development practice followed, called “DevOps”. Now, let’s understand the DevOps in detail.
The word DevOps is combination of two words: Development and IT Operations. Traditionally, software development is performed by separate team and IT Operations for product like infrastructure provisioning, SCM setup, deploy, monitor etc. are performed by a separate team often referred as IT Operation team. Integration of both teams is quite challenging as both teams are emerged and managed separately so it becomes to put them on common ground for application development and application development takes more time than usually it should take.
To deal with such situations, many organization starts evolving the development and IT operations to bring them much closer and associated and then a new term emerged called “DevOps”.
DevOps is a practice which combines the software development and IT Operations to reduce the software development and release timeline with high quality. It is highly motivated with Agile based software development methodology and its many aspects came from Agile only.
Micro-service based development and DevOps are highly associated and as both works together to provide high quality, rapid development of application with high used of automation.
Let’s discuss DevOps and Micro-service association more practically in subsequent sections.
About DevOps
DevOps is a practice which composed of Process, People and Toolset and which combined the software development and IT Operation together to achieve high quality, rapid software development with high use of automation.
By adhering DevOps practices, one can achieve:
- Rapid and speedy development, faster release of software product
- Agile based software development where development performed in continuous running cycle called Agile Sprint
- Decomposition of complex problems and solved
- Use of Continuous Integration (CI), Continuous Testing (CT) and Continuous Deployment (CD)
- Reliability, High quality with consistent testing and quality assurance.
- High use of automation with CI, CT, CD pipelines
- Scale, the infrastructure and development can be scaled as needed very easily
Below are the DevOps best practices:
- Micro-service — DevOps are highly linked with micro-service design pattern where a complex application is broken down into smaller self-independent runnable components which serve as specific portion overall application. Micro-service design with DevOps practice enables organization to deliver high quality and faster application development.
- Continuous Integration (CI) — It is a set of processes where developer write code and merge into the central repository often referred as Source Code Management (SCM) and after code merge, automated build and test performed on code. It provides easy detection of test failures, code merge issues, bugs etc. and reduce the overall time for development.
- Continuous Deployment (CD) — It is also a practice under DevOps which provides automated build, test, release preparation and deployment to PROD environment with automation. It provides easy movement from development to QA, QA to Staging and Staging to Production movement of code changes.
- Infrastructure as Code — It is emerging very faster as part of DevOps practice where Infrastructure is provisioned dynamically based upon the code or configuration with version control and continuous integration. There are associated practices like Configuration as Code or Policy as Code enables to write code for automating configuration of operating system, host and other policies.
- Communication and Collaboration — Communication and Collaboration is key practice of DevOps which brings all the resource together by enabling easiest communication channels like chat, project and issue management systems etc. so that each stakeholder can perform their responsibilities effectively and efficiently.
- Monitoring and Logging — Application monitoring is very important aspect of any application. DevOps provides tooling and platform for tailored monitoring system to keep watch on health of each micro-service. Logging is also an important aspect for DevOps which plays role in monitoring.
The DevOps practice has different setup processes applicable based upon organizational and project need. But there are some standards setup of processes which are commonly used across the project. These processes, forms a continuous cycle and covers the entire development, operation and monitoring life for the software product. It is typically depicted by using a continuous process sequence as:
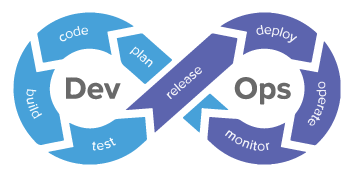
Once, the complete cycle of DevOps process executed, a new version of software product achieved. In case of micro-service design pattern, most of the processes are automated which are performed automatically. These processes-cycle also resemble Agile based development-cycle implementation where a Sprint is planned to develop certain features as part of release and process started sequentially towards achieving new version of product with expected feature.
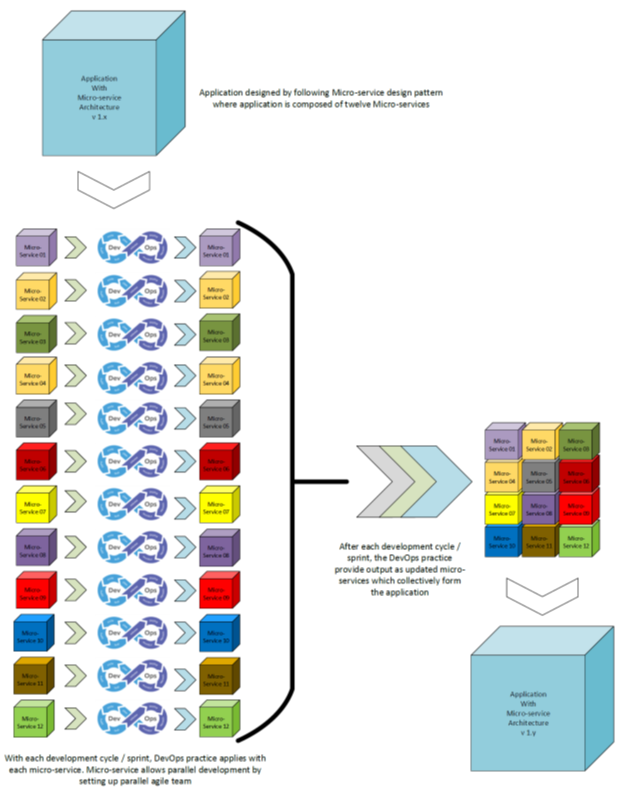
In case of micro-service design pattern, each micro-service goes with DevOps cycle to implement new features / bug fixes / capabilities. Mostly, when micro-service design pattern used, micro-service decomposition performed by using capability-based approach or domain-driven approach and separate team formed to develop each micro-service in parallel. Each micro-service follows the DevOps practice (with same Sprint size or different Sprint size) and after completion of Sprint, a new version of product produced. Let’s understand with below diagram:
DevOps processes are either performed manually by developers, automated with CI & CD pipeline or with combination of both (manually + automated, e.g. testing which comprised of manual and automated testing). Each process requires setup of tools which are used in DevOps. Let’s understand with below diagram:
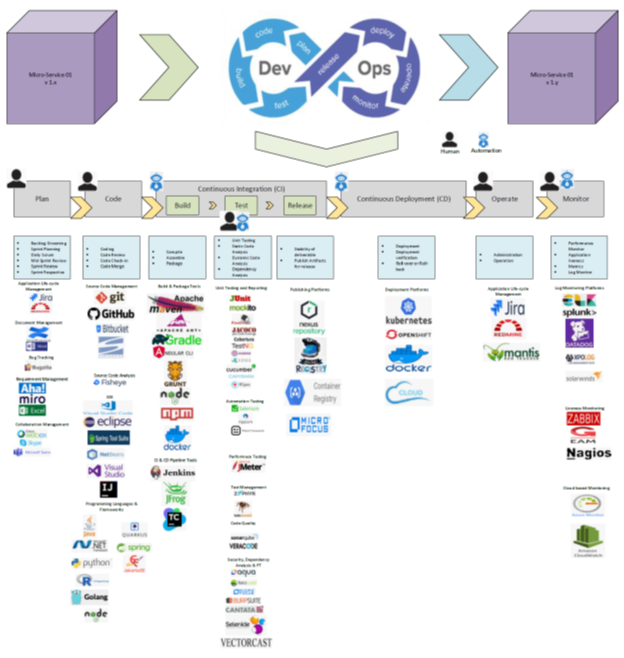
As depicted in the diagram, below are the processes which are performed sequentially:
- Plan — Planning is first process where is performed by the development stakeholders like Product Owner, Developers, Testers, DevOps Engineers etc. In this process, application life-cycle management tools, bug tracking tools are used e.g. JIRA, Redmine, Confluence, BugZilla etc.
- Code — Code process includes code writing, merging with source code repository management tools, peer review. Most of the tasks under this process are manual and performed by developers by using Programming Language, IDE and SCM tools.
- Build — Build is process where source code is compiled, assembled and formed the runnable artifact. It is part of Continuous Integration and performed by Automated build pipelines. The CI pipeline uses tools like Jenkins, Maven etc.
- Test — The test process is performed to verify that the written code is serving the expected functionalities or not without disturbing other functionalities written in the product. It is performed automated as well as manually and test tools are used like Junit, TestNG etc.
- Release — After testing, product is ready for release where release artifacts are prepared and release management is activated. In case of micro-service design pattern, release is fully automated and performed by releasing artifacts.
- Deploy — Deployment process is part of Continuous Deployment (CD) which is performed to install the released artifacts to the host machines so that it can start work. It is performed by automated deployment pipeline scripts and involves the deployment platforms and tools like Jenkins.
- Operate — After a successful deployment, operation started. The operation is performed by actual clients but it also involves the development stakeholders to track the operation gaps, bugs etc. and therefore involves ALM tools like JIRA or Redmine.
- Monitor — Monitor process involves liveness probe of running application, log monitoring and hardware / software monitoring & metrics. It provides data which helps to keeping application running smoothly.
These DevOps processes are depending upon the factors like organization, product, tech stack and development approach. Mostly, the common processes are followed as these are very obvious needs.
Whenever DevOps is discussed, the continuous processes are discussed like:
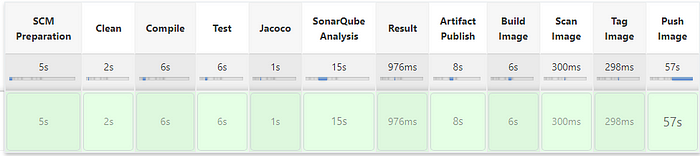
- Continuous Integration (CI) — The CI practice is set of processes and which comprised of steps like: SCM Preparation, Compile, Build, Test (Unit Test), Static Code Analysis, Build Artifacts. There must be slightly different is steps based upon programming languages and build tools but overall it covers compile, build and test. It is essential part of DevOps and mostly achieved with fully-automated workflows and executed by automation tools like Jenkins. There is specific term called ‘CI Pipeline’ emerged from CI process and used widely in DevOps environment to refer the Continuous Integration task set performed on source code.
- Continuous Test (CT) — It is also a practice of DevOps performed for verifying the code is behaving as per expectation or not. CT is mostly considered as part of CI.
- Continuous Deployment (CD) — The deployment is also automated in case of DevOps practice. It is often referred as Continuous Deployment (CD) practice and a workflow defined to deploy the application with help of automation tools like Jenkins. This workflow is referred as CD Pipeline. It picks the released artifacts (which produced during CD pipeline), placed into the deployment server and get deployed.
The CI and CD practices are often referred together as CI/CD or CI &CD and considered as core of DevOps as it automates the DevOps processes to achieve rapid and quality development.
To understand the processes and applicable tool under each process of DevOps, Figure 3 can be utilized. This also explains whether process performed manually or automated by using icons on the process boxes.
Environment Setup and Configuration
The DevOps practice & automation tools and applications can be setup in different type of platforms and data centers like on premise, Cloud and local. Most of the tools supports Windows, Linux, Mac and other platform support. Additional to the static platforms, the it supports containerization and Kubernetes based setup.
In some cases, the underlying platform also depends upon the development technology stack e.g. if deployment is planned on Kubernetes in with Linux base image on Window VM in Cloud, it is not feasible as it requires nested virtualization in Cloud which will not be available or may be available with additional cost only. Therefore, the development and deployment technologies must be chosen wisely based upon support and need.
To setup for demonstration purpose, bought two VMs in AWS Cloud:
- Windows Server 2019: Intentionally, taken Windows machine so that by using RDP, we can launch browser for application verification. Additionally, this machine will be utilized to setup Jenkins (as worker node will be made to other machine via agent), Nexus and SonarQube
- Ubuntu 20.04 LTS: This machine taken to setup deployment environment with docker and Kubernetes. There are two main reasons for selecting Linux machine: Firstly, the micro-services use alpine-linux as base image and to run it on docker, it requires underlying OS must be Linux or nested virtualization must be on. Since, using AWS VM, nested virtualization is not available so there is only one option that underlying VM must be Linux. Secondly, running full-version of Kubernetes requires at list two machines where one will be used as control-plane and other will be using as worker node, hence to save compute, we can setup minikube to mimic Kubernetes environment for demonstration purpose with single machine.
Notes:
- There could be various possibilities of infrastructure availability to setup DevOps tools e.g. setup on single machine, with dedicated machine for each component, full-version Kubernetes, Docker Desktop, virtual machine and on.
- The deployment can also be on Cloud based infrastructure like Azure Kubernetes Service, Elastic Kubernetes Service etc.
- Infrastructure can also be setup with Terraform with infrastructure as code
- This setup is just for demonstration not recommended for production
Install below on Windows Server:
Open JDK
The Nexus Repository Manager OSS, Jenkins and SonarQube runs on Java so it need to be installed
- Download binary (preferred version is JDK 11) from: https://openjdk.java.net/
- Install it and setup path JAVA_HOME
Maven
- Download binary (preferred version is 3.6.x) from: https://maven.apache.org/download.cgi
- Setup path M2_HOME
Setup Nexus Repository Manager OSS
Nexus Repository Manager OSS is most popular open-source deliverable repository to publish artifacts. It has been used into the pipeline.
To install, please refer the article: https://siddhivinayak-sk.medium.com/manage-libraries-artifacts-and-deliverables-with-nexus-repository-manager-oss-2252ec3a35ff
Setup SonarQube
SonarQube is a tool which is used for static and dynamic code analysis to analyze the project source to detect security vulnerabilities, performance suggestion, code smell, code bugs etc.
To install, please refer the article: https://siddhivinayak-sk.medium.com/static-dynamic-code-analysis-with-sonarqube-af689124dab0
Setup Jenkins
Jenkins is most popular and widely used open-source automation tool which helps in setup CI and CD pipeline. It has wide range of support of build tools, platforms, deployment platform etc. It provides hundreds of plugins which enriches its capabilities. It also supports Cloud based deployments.
To install, please refer the article: https://siddhivinayak-sk.medium.com/build-your-ci-cd-pipeline-with-jenkins-2dc082162f86
Note: After installation, configure and verify these are working correctly. Additionally, configure Security Group with incoming and outgoing traffic so that these applications can be accessed.
Installation for Ubuntu Machine:
Create local host entry to point Jenkins, Nexus and SonarQube with a DNS. For this edit /etc/hosts file and append entries as
sudo vim /etc/hosts
<IP> www.myjenkins.com
<IP> www.mynexus.com
<IP> www.mysonar.com
Replace <IP> with the actual machine IP on which Jenkins, Nexus and SonarQube is running.
Install Chrome Browser
Chrome is required to run test by Karma. Run below commands to install Chrome
wget https://dl.google.com/linux/direct/google-chrome-stable_current_amd64.deb
sudo apt install ./google-chrome-stable_current_amd64.deb
Obtain path of Chrome Binary
which chromium-browserSetup path of Chrome Binary (either google-chrome or google-chrome-stable binary)
export CHROME_BIN=/usr/bin/google-chrome
export CHROME_BIN=/usr/bin/google-chrome-stable
Install OpenJDK
sudo apt install openjdk-11-jdkInstall Apache Maven
sudo apt install mavenInstall NodeJS and NPM
curl -sL https://deb.nodesource.com/setup_16.x -o nodesource_setup.sh
sudo bash nodesource_setup.sh
sudo apt install nodejs
Install sonar-scanner and SonarQube reporter in NPM
npm install -g sonar-scanner --save-dev
npm install -g karma-sonarqube-unit-reporter --save-dev
Install Angular CLI
sudo npm install -g @angular/cli After npm installation, it is required to add npm so that while publishing artifact to Nexus, it can use this user to push artifacts [Note: Nexus Repository Manager must be up and running]
npm adduser --registry http://www.mynexus.com:8081/repository/mynpmrepo/ --always-auth Install Docker
To install docker, run below command sequentially
sudo apt install apt-transport-https ca-certificates curl software-properties-common
curl -fsSL https://download.docker.com/linux/ubuntu/gpg | sudo apt-key add -
sudo add-apt-repository "deb [arch=amd64] https://download.docker.com/linux/ubuntu focal stable"
apt-cache policy docker-ce
sudo apt install docker-ce
sudo systemctl status docker
sudo usermod -aG docker ${USER}
sudo su - ${USER}
groups
sudo usermod -aG docker ubuntu
Install Minikube
Run below command sequentially to install minikube
curl -LO https://storage.googleapis.com/minikube/releases/latest/minikube-linux-amd64
sudo install minikube-linux-amd64 /usr/local/bin/minikube
kubectl get po -A
minikube kubectl -- get po -A
minikube addons list
minikube addons enable ingress
Setup docker Image Registry
There are two ways of setting up docker image registry:
- Run docker registry directly on docker as daemon service
Change local path in -v switch as per local directory
docker run -d -p 5000:5000 --env REGISTRY_STORAGE_DELETE_ENABLED="true" -v /myapp/apps/registrydata:/var/lib/registry --restart=always --name hub.local registry - Install docker registry as Kubernetes deployment
Download kube-registry deployment YAML from: https://github.com/siddhivinayak-sk/jwt-openid-oauth2.0-keycloak-kerberos-ntlm/blob/main/spring-boot-jwt/kube-registry.yaml
kubectl -n kube-system create -f kube-registry.yaml [Optional] In case minikube is already running and need to reset install registry as Kubernetes deployment
minikube stop && minikube delete && rm -fr $HOME/.minikube && minikube start Create registry deployment
kubectl create -f kube-registry.yaml Test registry is working
minikube ssh && curl http://localhost:5000 [Optional] Port forwarding of registry which is running on port 5000 to localhost by using Kubernetes port-forward
kubectl port-forward --namespace kube-system $(kubectl get po -n kube-system | grep kube-registry-v0 | awk '{print $1;}') 5000:5000 Exposing registry on localhost by using ingress based port forwarding and access
kubectl -n ingress-nginx port-forward service/ingress-nginx-controller 30001:80 Note: This is only required when registry is exposed internally. Else, it can be exposed on node port and used directly with host IP.
Setup docker registry DNS name in /etc/hosts
# Get kubectl endpoint IP
kubectl get endpoints# Edit /etc/hosts and add entry for registry with obtained IP
sudo vim /etc/hosts
192.168.49.2 hub.docker.local
Make docker registry insecure to access it on HTTP from POD
Since registry is running on local and Kubernetes tries to access images from registry on HTTPS by default so need to mark local registry as insecure. For this, create a daemon.json file as
# Run command to create file and paste contents given below
sudo vim /etc/docker/daemon.json
{
"insecure-registries" : ["hub.docker.local:5000"]
}# Restart docker
sudo systemctl restart docker
Test Registry with DNS name
curl http://hub.docker.local:5000/v2/_catalog Install NGINX
When minikube runs, it creates a IP on local machine which starts from 198 (e.g. 192.168.49.2) and it will not be accessible from outside the machine. Therefore, need to install NGINX and map the internal IP services with localhost.
sudo apt install nginxChange NGINX configuration as
worker_processes auto;
pid /run/nginx.pid;
include /etc/nginx/modules-enabled/*.conf;events {
        worker_connections 768;
        # multi_accept on;
}http {##
        # Basic Settings
        ##sendfile on;
        tcp_nopush on;
        tcp_nodelay on;
        keepalive_timeout 65;
        types_hash_max_size 2048;
        # server_tokens off;# server_names_hash_bucket_size 64;
        # server_name_in_redirect off;include /etc/nginx/mime.types;
        default_type application/octet-stream;##
        # SSL Settings
        ##ssl_protocols TLSv1 TLSv1.1 TLSv1.2 TLSv1.3; # Dropping SSLv3, ref: POODLE
        ssl_prefer_server_ciphers on;##
        # Logging Settings
        ##access_log /var/log/nginx/access.log;
        error_log /var/log/nginx/error.log;##
        # Gzip Settings
        ##gzip on;# gzip_vary on;
        # gzip_proxied any;
        # gzip_comp_level 6;
        # gzip_buffers 16 8k;
        # gzip_http_version 1.1;
        # gzip_types text/plain text/css application/json application/javascript text/xml application/xml application/xml+rss text/javascript;##
        # Virtual Host Configs
        ###nclude /etc/nginx/conf.d/*.conf;
        #nclude /etc/nginx/sites-enabled/*;server {
            listen 80;
            server_name abc.com;
            access_log /var/log/nginx/abc-nginx.log;location / {
                proxy_pass http://192.168.49.2:80;
            }}}
Restart NGINX service
sudo systemctl restart nginx Use Case
A complete DevOps practice implementation requires:
- People — DevOps engineers need to be on boarded for the application.
- Toolset — DevOps tools need to be setup like JIRA, Jenkins, Maven etc. based upon the applicability.
- Process — Based upon DevOps toolset, project nature and infrastructure, processes need to be created by DevOps engineers with DevOps toolsets.
To demonstrate automation in DevOps by using CI/CD practices and part of this article coverage. We covered CI/CD pipeline setup for the micro-services. For this purpose, below tools need to be installed:
- Nexus Repository Manager OSS
- SonarQube Server
- Jenkins
- Programming Languages / SDKs: Java, Node, DotNet
- Build Tools: AngularCLI, Node, Maven
- Source Code Management Tool: Git, GitHub
- Deployment Platform: Docker, Kubernetes
Note: The installation steps have been covered in “Environment Setup and Configuration” section.
The CI/CD practices are often referred together but mostly pipeline developed separately for CI and CD. Reason for this, CI practice performed with each code change but deployment happens only when deployment is planned (mostly deployment requires various approvals e.g. Testing approval from Test Manager, Quality and Stability approval from Program Manager etc.). However, CD/CD pipeline can be created together which performs first CI steps and then performs CD steps.
In any steps, if failure happens, the process is failed and notified to the owner or stakeholders. Example, if code compilation failed, package is blocked. If test fails artifact publishing is aborted.
There are many tools and platform which provides automated CI/CD pipeline development. Jenkins is most popular and supported by wide range of underlying platforms, build tools, programming languages and Cloud. Additionally, it supports a wide range of plugins which enhance its capability to extreme level.
Jenkins by default support pipeline development with declarative pipeline based upon Goovy which executes on Groovy sandbox.
To demonstrate, few use cases given:
CI & CD for Java based Micro-service
To demonstrate the CI and CD pipeline, we first need a micro-service developed using Java. For this purpose, a micro-service developed in Java which uses below tech stack:
- Java as programming language
- Maven as build tool
- Spring Boot as framework
- GitHub as Source Code Management
- Docker as packaging tool
The pipeline created using Groovy based declarative pipeline code and added with project with name “Jenkins”. It will be configured into the Jenkins Job.
Once Job runs, it performs the set of tasks configured as part of the pipeline.
Note: Please follow associated article which guides on how to setup Jenkins and Job in Jenkins: https://siddhivinayak-sk.medium.com/build-your-ci-cd-pipeline-with-jenkins-2dc082162f86
Once CI completed, need to invoke CD pipeline where steps are configured for deployment. This has also been created in a file named “Jenkins.cd” in project directory. This will also require a running deployment environment. Once pipeline execution completed the deployment also been completed.
CI & CD for Node & Angular based Micro-service
To demonstrate CI and CD pipeline for Node based project where Angular has been used to develop front-end and create a micro-service which will be running on Node server. Below is the tech stacked touched here:
- Node and NPM
- Typescript as source code language
- NG CLI as compile, build and test (Build tool)
- Angular as framework
- GitHub as source code management
- Docker as packaging tool
Source: https://github.com/siddhivinayak-sk/node-angular-front-end
The pipeline created using Groovy based declarative pipeline code and added with project with name “Jenkins”. It will be configured into the Jenkins Job.
Once Job runs, it performs the set of tasks configured as part of the pipeline.
Note: Please follow associated article which guides on how to setup Jenkins and Job in Jenkins: https://siddhivinayak-sk.medium.com/build-your-ci-cd-pipeline-with-jenkins-2dc082162f86
Once CI completed, need to invoke CD pipeline where steps are configured for deployment. This has also been created in a file named “Jenkins.cd” in project directory. This will also require a running deployment environment. Once pipeline execution completed the deployment also been completed.

CI & CD for DotNet C# based Micro-service
To demonstrate CI pipeline for DotNet based project where C# has been used to create a micro-service which will be running on AspDotNet. Below is the tech stacked touched here:
- C# as programming language
- DotNet SDK as build tool
- ASP as framework
- GitHub as source code management
- Docker as packaging tool
Source: https://github.com/siddhivinayak-sk/dotnetmicroservice
The pipeline created using Groovy based declarative pipeline code and added with project with name “Jenkins”. It will be configured into the Jenkins Job.
Once Job runs, it performs the set of tasks configured as part of the pipeline.

Note: Please follow associated article which guides on how to setup Jenkins and Job in Jenkins: https://siddhivinayak-sk.medium.com/build-your-ci-cd-pipeline-with-jenkins-2dc082162f86
Note: These use case and examples are only for education & testing purpose. DO NOT USE FOR PRODUCTION.
Conclusion
DevOps and micro-service design pattern are used together to provide high quality and rapid software development. It takes advantage of automation with CI and CD practices automated with help of automation tools and technologies.
Both DevOps and micro-service are emerging day-by-day because it has many benefits over the conventional / monolithic application design patterns.
Most of the Cloud vendors provides their own set of tools to provide Cloud Native DevOps environment like Azure provides: Azure DevOps Organization — provides source code and project management & Azure DevOps Starter — provides CI / CD Workflow and pipeline. AWS provides: AWS Code Commit — Git based SCM tool, AWS Code Pipeline (AWS Code Build and AWS Code Deploy) — pipeline platform to build and deploy Cloud Native applications. GCP provides: Cloud Source Repositories — SCM tool, Artifact Repository — deliverables repository similar to Nexus Repository, Cloud Build — a build pipeline tool. Apart from the Cloud Native DevOps tools, most Cloud Vendors also facilitates infrastructure to setup own open-source DevOps environment by using tools like Jenkins, Maven etc.
Links of Work on GitHub
This article covers the CI & CD pipeline for setup for application designed based upon micro-services design pattern where a complex application is decomposed in multiple micro-services, and these micro-service may be polyglot.
To use the work and play with CI & CD. Please setup the required environment first and work on setting up pipeline with work stored on GitHub.
To achieve the CD & CD pipeline setup for micro-services, we have created few micro-services using different programming languages:
- Java & Spring based micro-service — A Java & REST based service created using Spring Boot framework with embedded tomcat. It will expose few end-points which will be consumed from Frontend.
GitHub Link: https://github.com/siddhivinayak-sk/jwt-openid-oauth2.0-keycloak-kerberos-ntlm.git
Note: For maven based project, the link for SonarQube and Nexus is placed into the pom.xml file. In source code, pom.xml contains Nexus URL (www.mynexus.com) in distribution management and SonarQube URL (www.mysonar.com) in properties section so both URLs must be resolved. To resolve these URL, /etc/hosts entries are defined in setup section. Additionally, SonarQube environment can also be configured in Jenkins’ -> ‘Global Tool Configuration’, this also must be configured with credential.
- Angular micro-service — This is an angular project using typescript and NodeJs. Its deployment has been designed on Node server. When it will run, it will serve the web pages where user logins with username and password (admin / admin). It internally, uses Java based backend service to perform login. After login it makes call to protected REST resource with JWT token.
GitHub Link: https://github.com/siddhivinayak-sk/node-angular-front-end.git
Changes based upon environment:
Change the IP / URL in environment.ts & environment.prod.ts so that It will point to correct backend services — https://github.com/siddhivinayak-sk/node-angular-front-end/blob/main/src/environments/environment.ts
Note: In NodeJS project, to perform SonarQube analysis and publish result to SonarQube application, a file named sonar-project.properties which contains SonarQube application URL, username and password. To target NPM registry on Nexus Registry Manager and its credential, first need to bind registry with credential with npm adduser command mentioned in setup section.
- DotNet micro-service — It is again a micro-service which has been developed using C# and CI pipeline created which performs CI steps and push the artifact to docker repository.
GitHub Link: https://github.com/siddhivinayak-sk/dotnetmicroservice.git
Changes based upon environment:
Change the SonarQube host IP / URL in Jenkins file so that it points to correct SonarQube instance https://github.com/siddhivinayak-sk/dotnetmicroservice/blob/main/Jenkinsfile
References
- Build Your CI & CD Pipeline with Jenkins — https://siddhivinayak-sk.medium.com/build-your-ci-cd-pipeline-with-jenkins-2dc082162f86
- Static + Dynamic Code Analysis with SonarQube — https://siddhivinayak-sk.medium.com/static-dynamic-code-analysis-with-sonarqube-af689124dab0
- Manage libraries, artifacts and deliverables with Nexus Repository Manager OSS — https://siddhivinayak-sk.medium.com/manage-libraries-artifacts-and-deliverables-with-nexus-repository-manager-oss-2252ec3a35ff
- Java Sample Project — https://github.com/siddhivinayak-sk/jwt-openid-oauth2.0-keycloak-kerberos-ntlm.git
- DotNet Sample Project — https://github.com/siddhivinayak-sk/dotnetmicroservice.git
- Node & Angular Sample Project — https://github.com/siddhivinayak-sk/node-angular-front-end.git
About the Author

Sandeep Kumar holds Master of Computer Application degree working as Java developer having 10+ years of working experience. He has experience design and development of enterprises applications in domains like education, content, laboratory, and banking; got various appreciation for his solutions including spot appreciation for Glassfish to JBoss migration project. He secured Google Cloud Developer certificate and participated into OCI trainings. He is a part of HCL-ERS platform as Sr. Lead developer.
